How to Edit Code in WordPress? HTML, CSS & PHP
WordPress is a user-friendly platform that allows individuals and businesses to effortlessly create and design attractive websites. The platform itself offers a range of customization options; however, there are some cases when you need to get into the code to achieve specific looks and functionalities. Here, we will guide you on how to edit code in WordPress, considering HTML, CSS, and PHP.
Things to Keep in Mind Before You Edit Code in WordPress
You can unlock new functionalities in your website by editing the code in WordPress. Still, before you initiate the code editing, there are some important factors to consider to ensure a smooth and secure process.
1. Backup Your Website:
The first and most basic step before making changes to your website’s code is taking a backup. A complete backup of your website will help you if anything goes wrong in the editing process. With this precaution, you can simply revert to a stable version of your website. There are various backup plugins in WordPress, you can also use the backup stored by your hosting provider.
2. Use a Child Theme:
Using a child theme is also highly recommended while customizing your theme code. A child theme is a separate theme that contains your parent (main) theme’s styles and functionality. When you use the child theme to make the changes, it will prevent the changes from getting overwritten when the parent theme receives updates. This step is crucial to maintain consistency and avoid potential conflicts.
3. Document Your Changes:
Effective documentation is a key practice for any coding process. Before, during, and after making the changes, document every single thing. Write what you are doing and why. This document will serve as a reference for future edits, help you in troubleshooting, providing insights into your website’s evolution. The document can be anything, a simple note in a text file, or a detailed log; it will work as an invaluable asset.
4. Test Changes in a Staging Environment:
We know the desire to see the immediate changes on your live website can be tempting; however, it is a wise step to test your modified code in the staging environment first. A staging environment is an essential replica of your live website where you can experiment without affecting the functionality and user experience of your site. Keeping this checkpoint will allow you to identify and rectify the issues before publishing them to the live site.
5. Stay Informed About Updates:
Before you make any changes to your code, check for updates in your WordPress core, theme, and plugins. The latest version can often resolve the existing website issues, and help you improve the security. Also, keep an eye on the specific recommendations and warnings provided by the developers regarding the code changes in the latest updates.
6. Understand the Impact:
A single code modification has the potential to impact your website’s functionality and appearance. Before you make the changes, properly understand what a code does and what can be its potential consequences. If you are unsure about the changes, seek guidance from online resources, WordPress & specific plugin forums, or consult with a developer. This helps you ensure that your changes align with your desired website output.
7. Regularly Review and Cleanup:
Over time, websites update, and so does the code. Regularly review website codebase to identify and remove any outdated or unnecessary code. This will help you efficiently run the website and reduce potential conflicts and compatibility issues.
By following these guidelines, you establish a solid foundation for code editing in WordPress.
How to Edit HTML Code in WordPress?
To customize the appearance and functionality of your WordPress site, you can make changes to your HTML code. Depending on your specific requirements and preferences, you can choose different editors to do the job. There are mainly three types of editors in WordPress, let’s understand them individually.
Block Editor:
The Block Editor was introduced in WordPress 5.0 as a replacement for Classic Editor. It works with a modular approach where each piece of the content is a “block”. A block can be a paragraph, image, heading, or any other element. This visual editor offers a more automatic and flexible editing experience. Using the Block Editor, you can create complex layouts without getting into the code. However, if you need to make any HTML changes to an individual block, here is how to do it.
Edit HTML Code in Block Editor:
Here is the step-by-step process for editing HTML code in Block Editor:
1: From your WordPress dashboard, open the particular post or page that you need to edit.
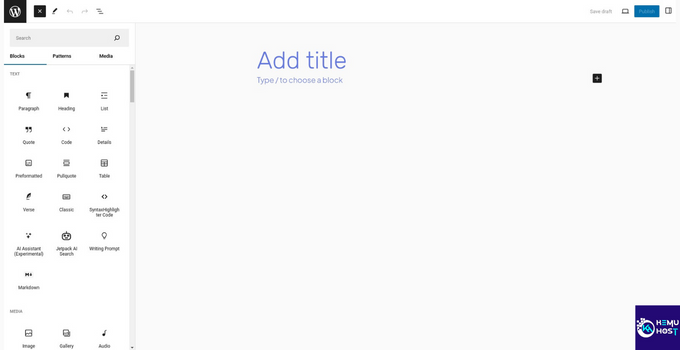
2: In the top right corner of your screen, you will find three dots. Click on it.
3: Find and click the option: Code Editor, or click “Ctrl + Shift + Alt + F” on your keyboard.
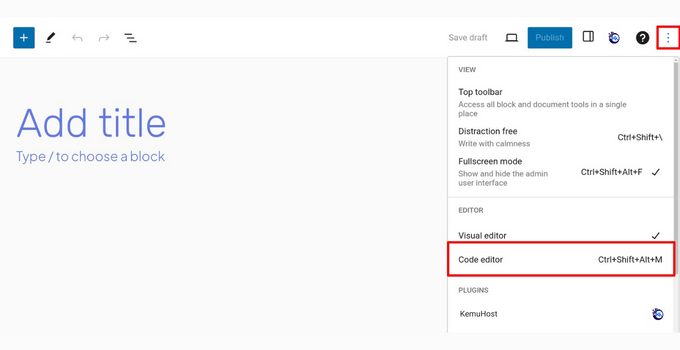
4: Each content block will appear with its code. You can make the required HTML changes here.
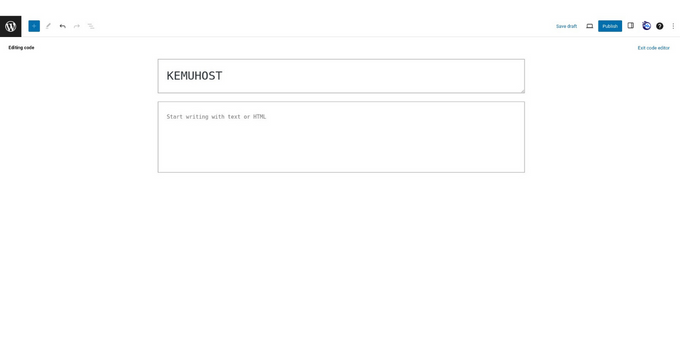
5: Once you made the changes, you can switch back to visual mode and check the result.
6: Once you are satisfied with the outcome, save the changes.
If you don’t already have a block and want to add a new HTML block, you can follow the steps below:
1: Within the block editor, click on the “+” icon to add a new block.
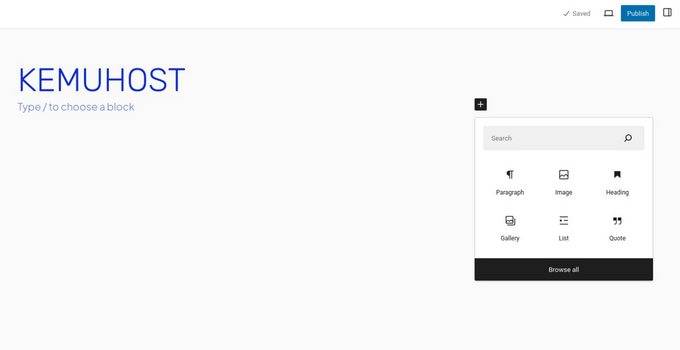
2: Search for the HTML block and add it to your page.
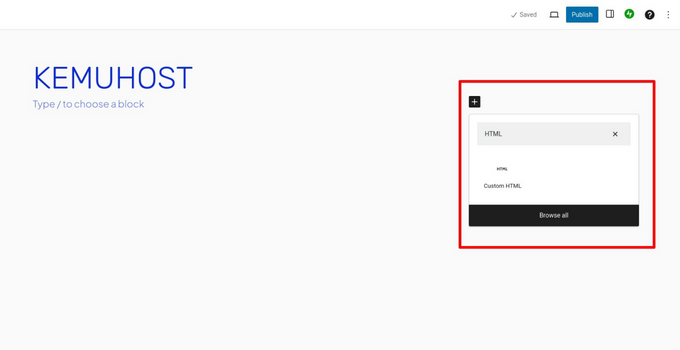
3: Once the block is added, you can directly paste the code into it.
Classic Editor:
The Classic Editor is the traditional WordPress editor that people used before the introduction of the Block Editor. The platform provides a straightforward interface with a single text box where users can add and format their content. While the Classic Editor doesn’t have the visual versatility of the Block Editor, some users prefer it because of its simplicity and familiarity.
Edit HTML Code in Classic Editor:
You can easily edit the code in the Classic Editor by doing this:
1: From your WordPress dashboard, open the particular post or page that you need to edit.
2: In the top right corner above the text box, you will find two tabs: Visual and Text.
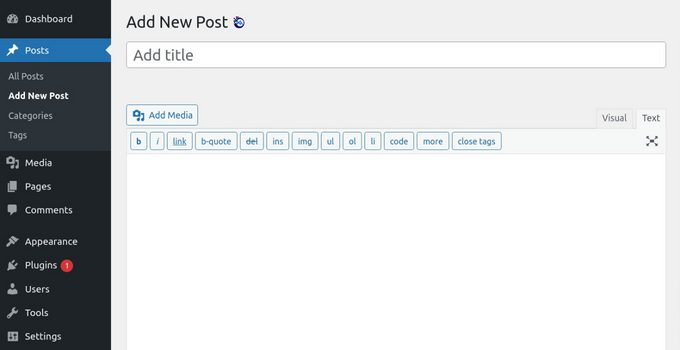
3: Click on the Text tab, and the content will appear in the plain text format.
4: By default, there will not be an HTML code, but you can add your desired code here.
5: Once you made the changes, you can switch back to visual mode and check the result.
6: Once you are satisfied with the outcome, save the changes.
This is a straightforward method for users familiar with HTML and Classic Editor.
Theme Editor:
The Theme Editor is a built-in feature in WordPress that allows you to modify the code of your website theme. This editor provides access to the theme files including CSS and PHP template files. The theme editor is a powerful tool to make the customization, but any incorrect modification can potentially break your whole website. Here, using a child theme and creating backups before making the changes is highly recommended.
Edit HTML Code in Theme Editor:
By default, Theme Editor shows the CSS and PHP code; however, you can make changes to some theme components, such as the footer using HTML. Here is how you can edit the HTML code:
1: From your WordPress dashboard, go to “Appearance” and select “Theme Editor”.
2: Choose the theme file you want to edit, such as “header.php” or “footer.php.”
3: If you’re working with a child theme, ensure you select the file from the child theme.
Tip: If your child theme only shows style.css and functions.php, you will have to copy your HTML files in the child theme before making the edits. You can copy that using FTP or your web hosting control panel.
4: Make the necessary HTML changes directly in the editor.
Before making any changes to the Theme Editor, make sure what that does. If you are unsure about the change, it is recommended to avoid it because it can break your theme and website.
By effectively understanding and using these editors, you can make HTML edits to create a website that aligns with your vision and meets your specific requirements.
How to Edit CSS and PHP Code in WordPress
You get the flexibility of advanced customization by editing CSS and PHP. By doing this, you can tailor the appearance and functionality of your website as per your requirements. Let’s understand how you can make edits in CSS and PHP using the Theme Editor:
Edit CSS in WordPress Theme Editor:
The steps to edit CSS in WordPress are pretty similar to what we discussed earlier.
1: From your WordPress dashboard, go to “Appearance” and select “Theme Editor”.
2: Find and select the “style.css” file. If you’re working with a child theme, ensure you choose the file from the child theme directory.
3: Once you’ve selected the stylesheet, you can make CSS changes directly in the editor. Make sure you wrap your styles in appropriate tags.
4: Save the changes once you are done.
Edit PHP in WordPress Theme Editor:
Similarly, here are steps to edit PHP in WordPress Theme Editor.
1: From your WordPress dashboard, go to “Appearance” and select “Theme Editor”.
2: Find and select the “functions.php” file. Always use a child theme for changes to ensure your modifications are not overwritten during theme updates.
3: Once you’ve selected the stylesheet, you can make PHP changes directly in the editor. Remember that PHP is a server-side scripting language, and incorrect edits can cause errors. Ensure your code follows the PHP syntax.
4: Save the changes once you are done.
How to Optimize Code for Better Performance?
To allow a WordPress website to operate efficiently and provide a seamless experience for visitors, a crucial is optimizing your code. There are various techniques to optimize your code. Here, we will explore the best practices to boost the performance of your WordPress site.
1. Minimize and Combine Files:
One of the basic and effective ways to optimize your code is to minimize and combine CSS and JS files. If you are unsure how to do it, you can use plugins like Autoptimize, which automatically combine and compress these files. This helps you reduce HTTP requests and speed up the page load times.
2. Use a Content Delivery Network (CDN):
A Content Delivery Network distributes static assets like images, CSS, and scripts across multiple servers worldwide. This helps you reduce the physical distance between the user and the server which results in a faster loading time. This strategy is specifically more useful for visitors from different geo-locations.
3. Enable Caching:
Enable caching on your website to store static versions of your pages. This strategy significantly reduces the server load and accelerates page loading for users who have previously visited your site. You can use popular caching plugins like W3 Total Cache or WP Super Cache to simplify this process.
4. Regularly Update Themes and Plugins:
Always make sure that your WordPress themes and plugins are up to date. Developers often release updates with performance improvements, bug fixes, and security enhancements. These regular updates help keep your website running smoothly and securely.
5. Remove Unnecessary Code:
Periodically review your theme and plugin code to identify and remove any unnecessary or unused elements. Such unused code can contribute to increased page load times which negatively impacts the website performance.
6. Optimize Code for Mobile:
Ensure that your website and code are optimized for mobile devices. Responsive design adapting to different screen sizes is crucial for a smooth user experience on smartphones and tablets.
Note that optimizing the code is an ongoing process. By following the above strategies, you can effectively improve the speed and performance of your WordPress website. This will help you boost user experience and search engine rankings as a whole.
Conclusion
Editing the Code in WordPress can be an exciting task that can give you attractive results. By following the best practices you can confidently edit the HTML, CSS, and PHP files to customize your website according to your vision. Consider checking our Powerful and Fast WordPress Hosting plans with fully managed support and a 99.99% uptime guarantee to get your WordPress sites to new heights.
