How to Add Signature in Outlook: Step-by-Step Guide

If you are in the IT field, you must have heard a question: “How to Add Signature in Outlook?” According to a survey conducted by Litmus, Outlook is the third most popular email client, with a market share of 4.33%.
In the current digital world, attention to detail can make a significant impact. Such detail people often ignore, can play a vital role in establishing your identity and professionalism in your email signature. A perfect signature provides your contact information and reflects your brand as well. And it also gives a personal touch to your email communication.
In this guide, we will see how to add signature in Outlook.
Importance of Email Signature

An email signature is similar to a digital business card. It acts as a virtual introduction, making it easy for the recipients to identify and contact you. Whether you are a business expert, a freelancer, or a student, adding a signature to your emails offers definite advantages.
1) Make a First Impression Professional
As we know, the impression counts! Simple but significant benefit. An email signature represents both yourself and your business.
You can add lots of information about your brand and links to your accreditations. But it would be best to keep it simple with your name and company website. Including an email signature will always look more professional.
2) Boost the Brand Awareness
Suppose you do not have a signature in your email. In that case, you are missing an opportunity to spread the word about your business. Such missed opportunities add up when you remember that every employee sends thousands of emails a month!
A perfect signature includes your name and job title, your company logo, and a link to your website. It means that even if the recipient is not interested in your product today, they will still recognize your brand for their future requirement.
3) Social Media Followers
An email signature is a quick and most effortless solution to increase social media followers. All you need to do is, add your social media account links/icons; clicking on it will take the users to your social media page.
You can gradually build your social media followers with almost NO EFFORTS.
4) Show Consistency
One of the biggest challenges businesses face today is ensuring consistency and brand alignment across all their marketing platforms. The beauty of an email signature is that it provides consistency across all your business emails and allows you to effectively show what your business is about and your brand image.
5) Promote Offers
Even if you want to keep your signature professional, there is nothing wrong with adding a link or small promotion banner or discount coupon code. If you run any special offers, you can add the details/link to the offer page in your email signature. The recipients will be happy to receive a discount directly to their inbox.
6) Encourage Online Reviews
If you are a new business, it is tough to generate reviews. An email signature is the easiest way to create reviews. You can add a “Review Us” text/button to your email signature, redirecting users to a survey site and encouraging them to write a product review.
How to Add Signature in Outlook – Windows OS

Suppose you are using the Outlook email client application on your Windows Desktop. In that case, you can create a signature by referring to the following steps:
1) Open the Outlook application on your PC/Laptop.
2) Now, click on the search box at the top-left side of your Outlook and type “signature”.
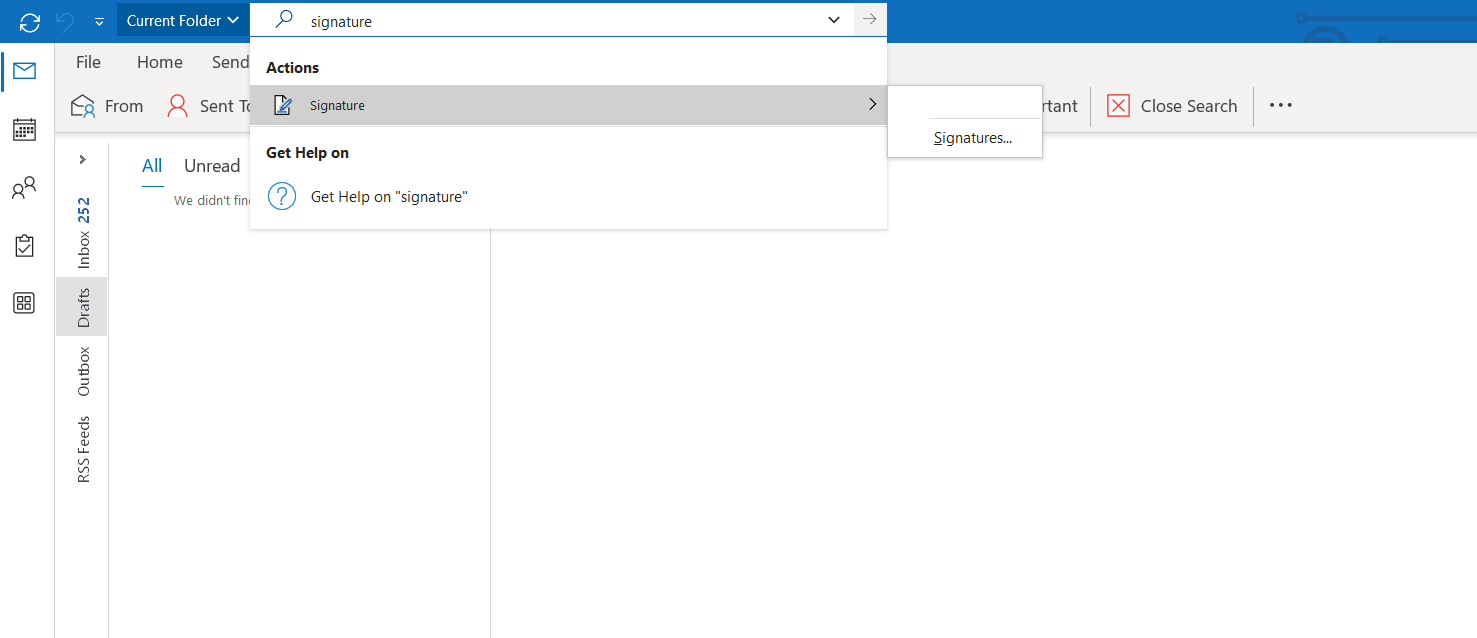
3) Click on Signature ⇒ Signatures. You will see a new in-app editor, “Signatures and Stationery.”
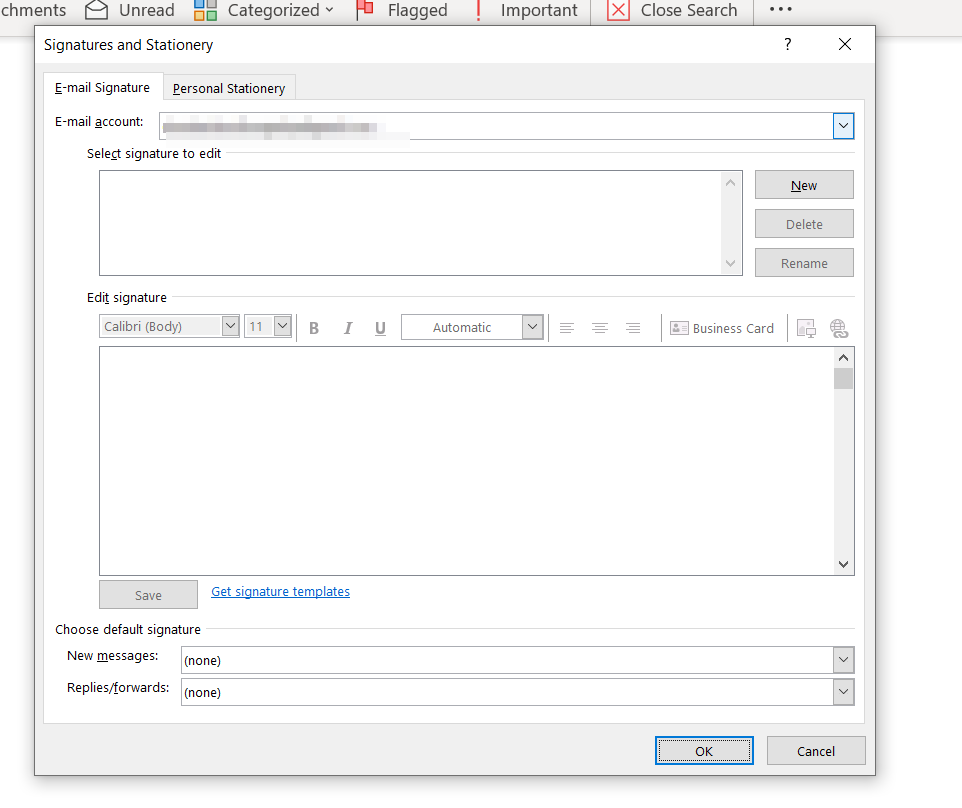
4) Click on the “New” button, name your signature and click on OK.
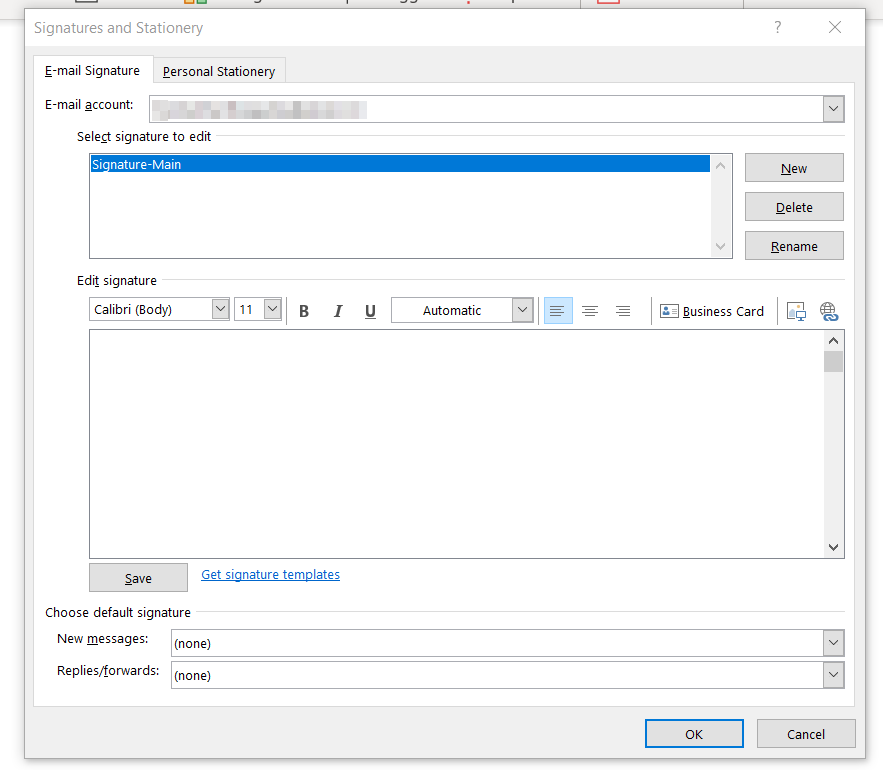
5) You can create your signature in the “Edit Signature” field.
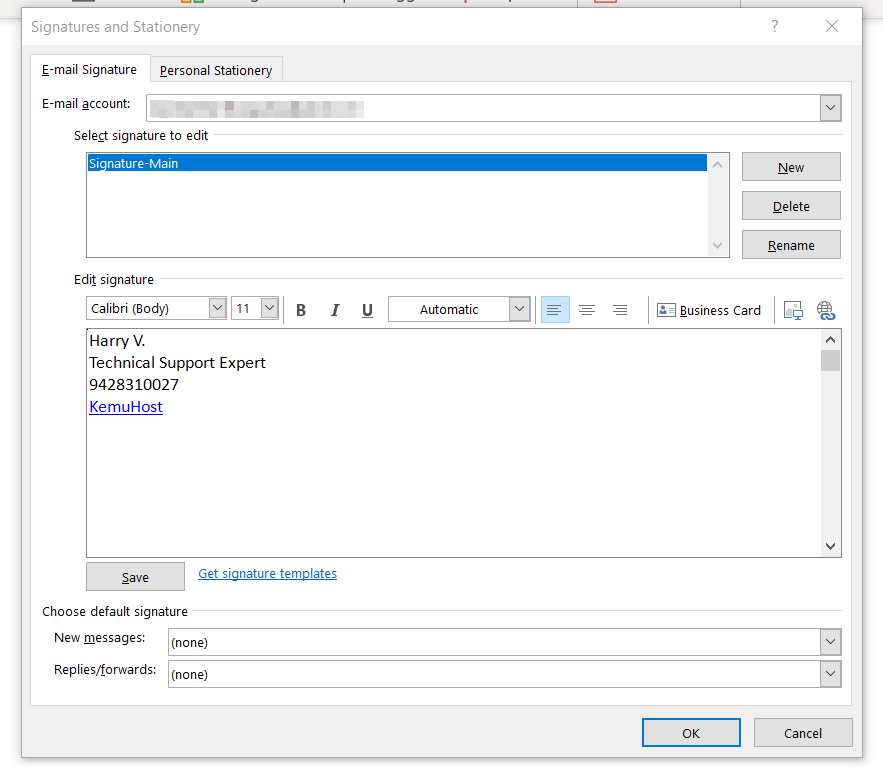
6) IMPORTANT: If you have multiple signatures, you can choose which signature should be there when you compose a new email and when you reply or forward the emails. Take a look at the following screen capture.
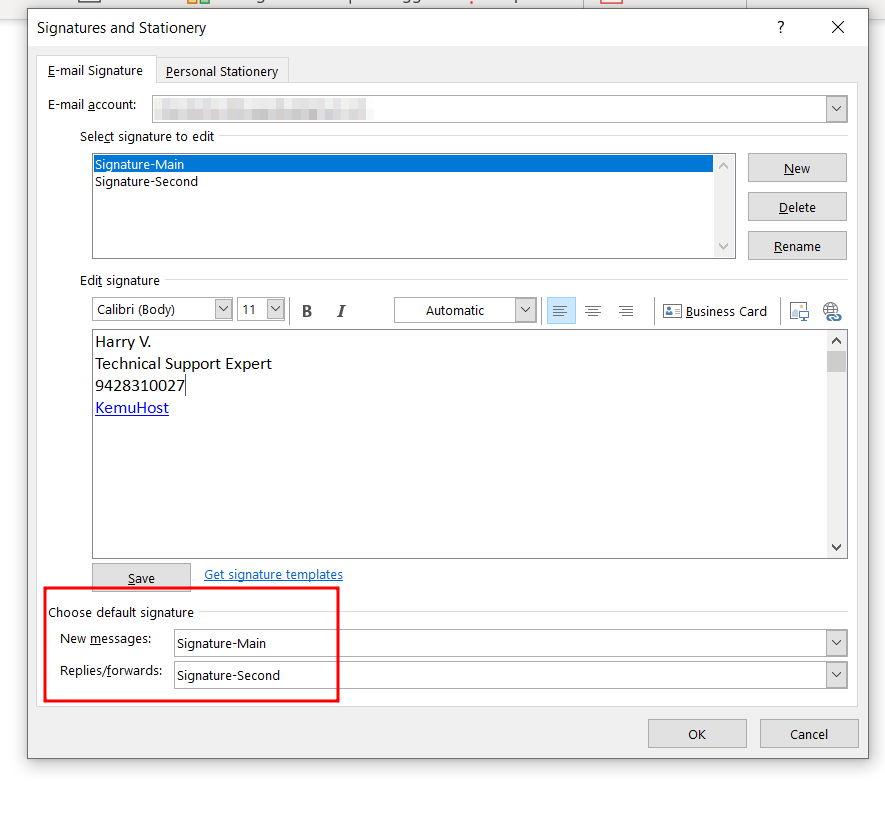
Now, when you compose a new email, reply to any email, or forward any email, your signature will automatically be attached to your email.
How to Add Signature in Outlook.com (Web)

Adding a signature in Outlook web is very easy.
1) Open your Outlook account on the web.
2) Click on the “Settings” gear icon at the top right corner of the page.

3) Now, navigate to Mail ⇒ Compose and reply. You will see an option for Email Signature.

4) Enter the name for your Signature. Create your eye-catching signature and click on Save. Also, do not forget to select your signature for New Messages and Replies/Forwards. See the following screen capture.
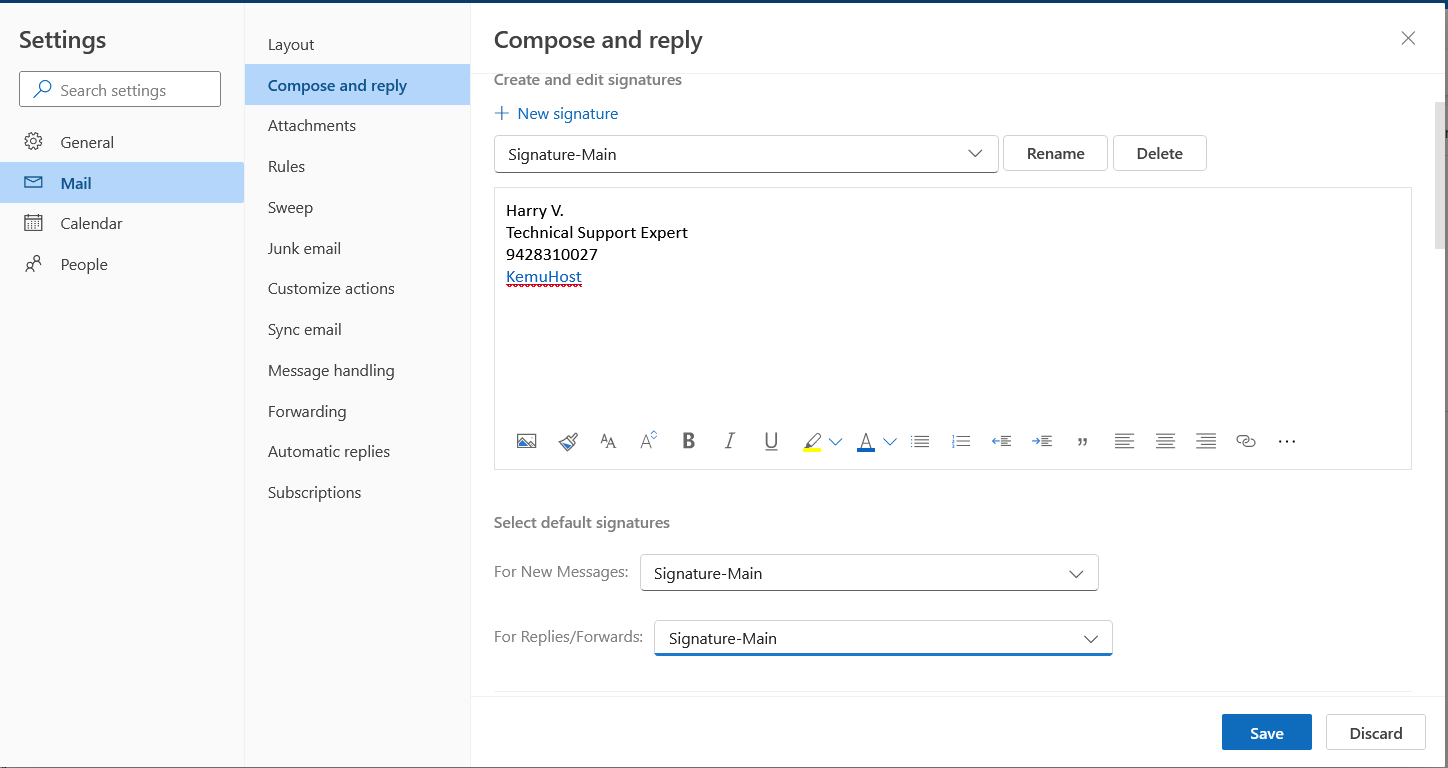
Now, when you compose a new email, reply to any email, or forward any email, your signature will automatically be attached to your email.
How to Add Signature in Outlook – Mac OS

You can create a signature in Outlook on Mac OS by referring to the following steps:
1) Open your Outlook on Mac.
2) Go to the tools menu, then click preferences.
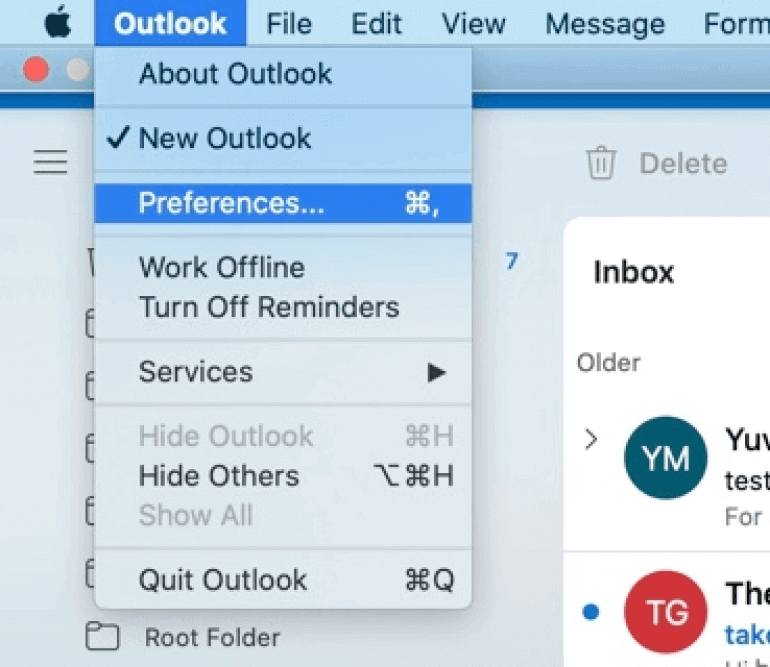
3) Out of many Icons, click on Signatures Icon.
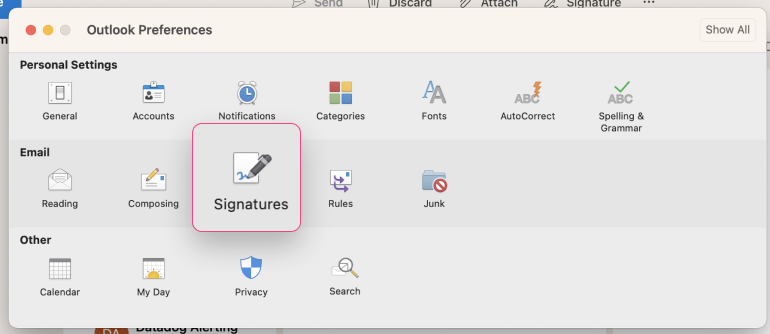
4) Click the + button to create a new email signature and select the edit option.
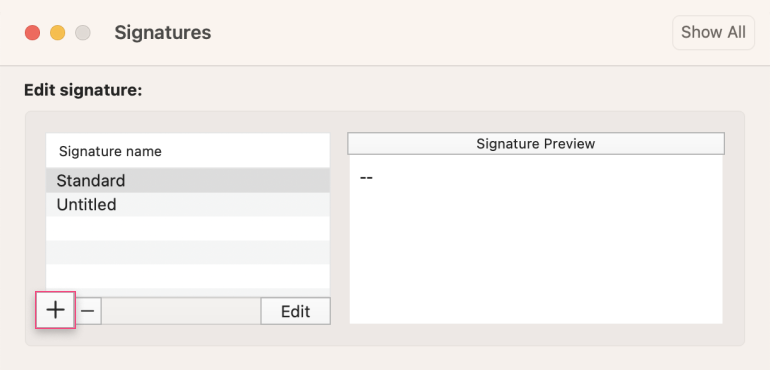
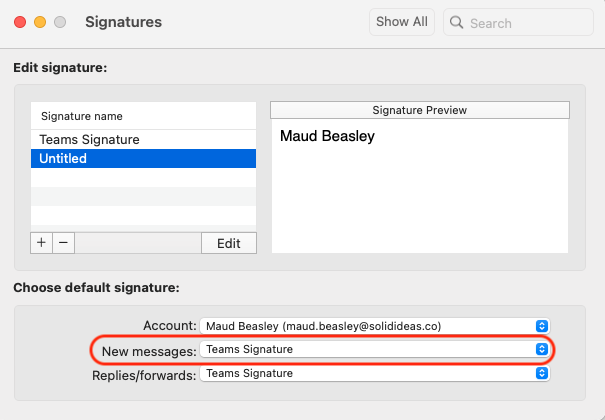
5) Create your signature, and do not forget to select the signature for New Messages and Replies/Forwards.
Conclusion
In the current digital competitive world, one should never underestimate the significance of small details. At first sight, you may find it useless to add a signature to your emails. But, its impact can be substantial.
Following the tips in our guide: How to Add Signature in Outlook, you are on the right track to enhancing your professional communication. You will see a meaningful impact once you have a signature on all of your emails. If you still face any issues while adding a signature in Outlook, feel free to contact us.


